Creating a Scenario: Difference between revisions
No edit summary |
|||
| (7 intermediate revisions by the same user not shown) | |||
| Line 1: | Line 1: | ||
Before you work on a scenario you should create the map you want to use with the scenario. | Before you work on a scenario you should [[Creating a Map|create the map]] you want to use with the scenario. | ||
Maps and scenarios are independent entities in "Conflict of Heroes." You can have one map that is shared by multiple scenarios, for instance. | Maps and scenarios are independent entities in "Conflict of Heroes." You can have one map that is shared by multiple scenarios, for instance. | ||
| Line 92: | Line 92: | ||
For example, here's text from a region script that invalidates all hexes that cannot be seen by friendly units. I post it merely to give you an idea of what these scripts look like. Time permitting, I can write more scripts if there are particular requests. The goal is to build up a little library of scripts that can be reused in ongoing firefight development, both for this game and for any sequels or expansions. | For example, here's text from a region script that invalidates all hexes that cannot be seen by friendly units. I post it merely to give you an idea of what these scripts look like. Time permitting, I can write more scripts if there are particular requests. The goal is to build up a little library of scripts that can be reused in ongoing firefight development, both for this game and for any sequels or expansions. | ||
< | <code> | ||
// CONFLICT OF HEROES<br> | // CONFLICT OF HEROES<br> | ||
// Selection Script<br> | // Selection Script<br> | ||
| Line 109: | Line 110: | ||
// invalidate all hexes | // invalidate all hexes | ||
context.GameScene.LineOfSight.InvalidateAll(context.GameScene.HexMap); | context.GameScene.LineOfSight.InvalidateAll(context.GameScene.HexMap); | ||
context.GameScene.LineOfSight.Clear(); | context.GameScene.LineOfSight.Clear(); | ||
// remove invalid hexes wherever player can has a unit that can see | // remove invalid hexes wherever player can has a unit that can see | ||
foreach (Piece pc in context.PieceManager.GetPiecesOfPlayer(context.ActivePlayer)) | foreach (Piece pc in context.PieceManager.GetPiecesOfPlayer(context.ActivePlayer)) | ||
| Line 120: | Line 120: | ||
} | } | ||
} | } | ||
</ | </code> | ||
Latest revision as of 20:16, 4 June 2012
Before you work on a scenario you should create the map you want to use with the scenario.
Maps and scenarios are independent entities in "Conflict of Heroes." You can have one map that is shared by multiple scenarios, for instance.
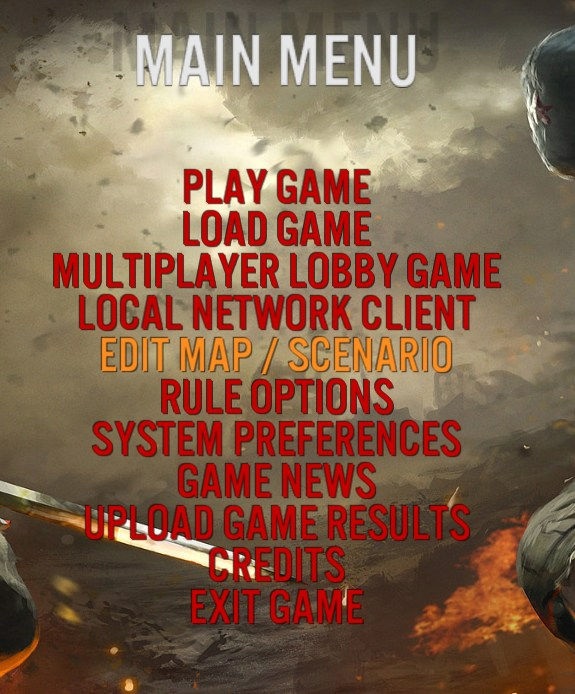
To edit a scenario, launch the game in editor mode. If you have successfully launched in editor mode, then you should see a new "Edit Map / Scenario" link on your main menu as shown below:
(If you just finished creating a map and building the LOS file, you'll already be in the editor, and will see the main editor screen.)
Main Editor Screen
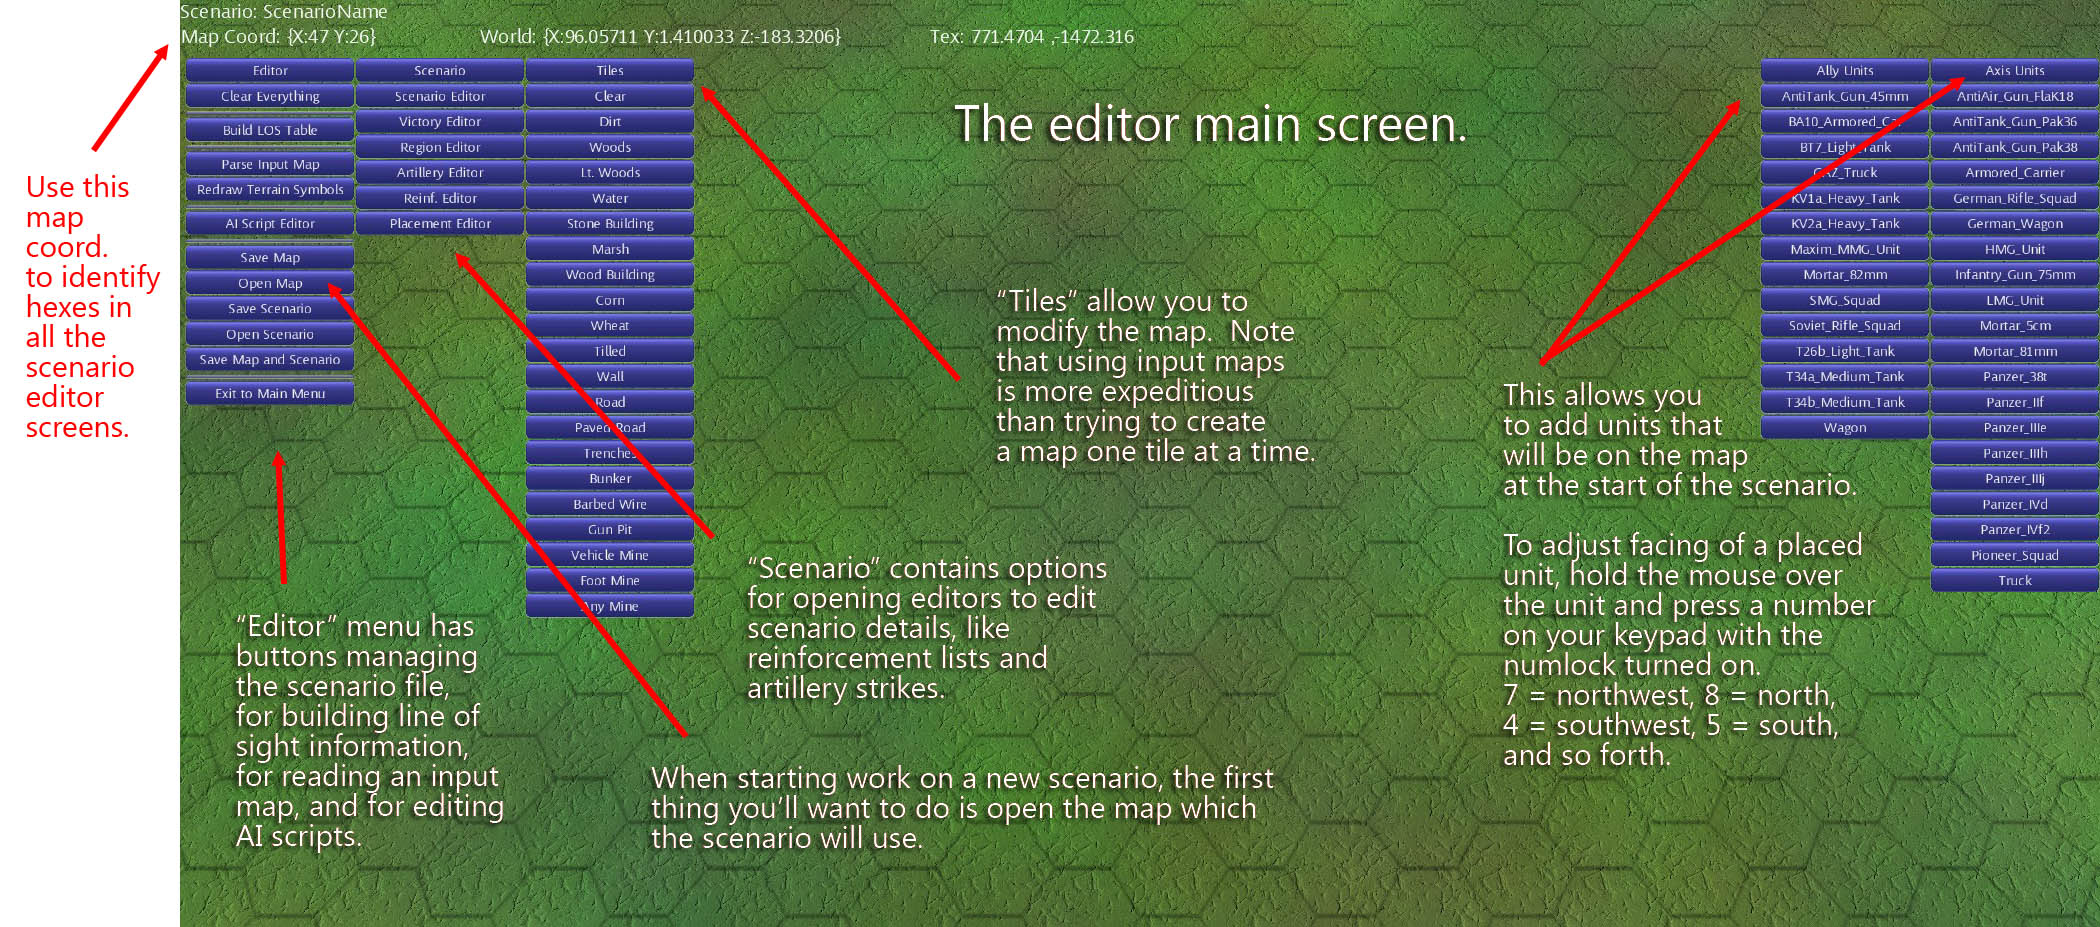
Here's the main editor screen:
Note that Open Map is the first thing you should click when creating a scenario. You'll then select a map from your map files, and you'll be able to begin designing your scenario. REMEMBER: the LOS file for the map must be built before you complete the scenario. If it is not, see the Building the LOS File section.
Useful Keyboard Shortcuts
Delete - deletes units under the mouse cursor, may also delete scenery but don't worry about this
CTRL+SHIFT+N - sets bottom left limit of defined map region under the mouse cursor
CTRL+SHIFT+M - sets upper right limit of defined map region under the mouse cursor
E - opens AI editor for piece under mouse cursor
F# - F1, F2, etc. the function keys can be programmed in the AI editor to attach assigned scripts to units under the cursor
V - test line of sight by showing what the hex under the cursor can see. Use only on a map with a LOS table.
Num Pad 7,8,9,4,5,6 - change facing for unit under cursor. Note that numlock must be on.
Note that while you can use CTRL+SHIFT+N/M to set map boundaries, this is normally done on the input map, and if it's been done there you don't need to do it again in the editor.
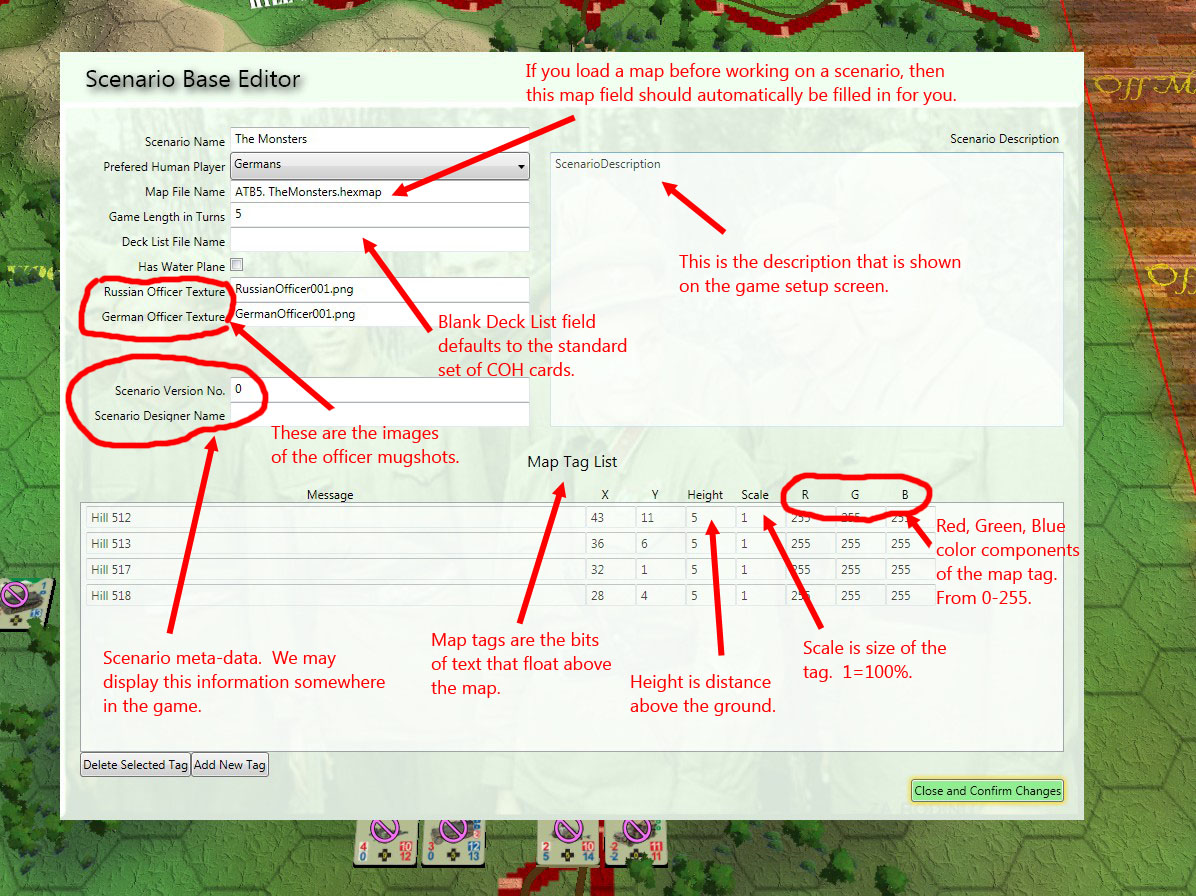
The Base Scenario Editor
Once you've opened a map, you'll open the Scenario Editor.
Keep the water plane turned off unless you've got a map with water on it.
The human preferred player is the default human player when the scenario loads. Generally the human preferred player should be the player that has to make the more complicated decisions in the firefight, often the attacking player, or the player who has to figure out how to get wagons across the map safely, or similar.
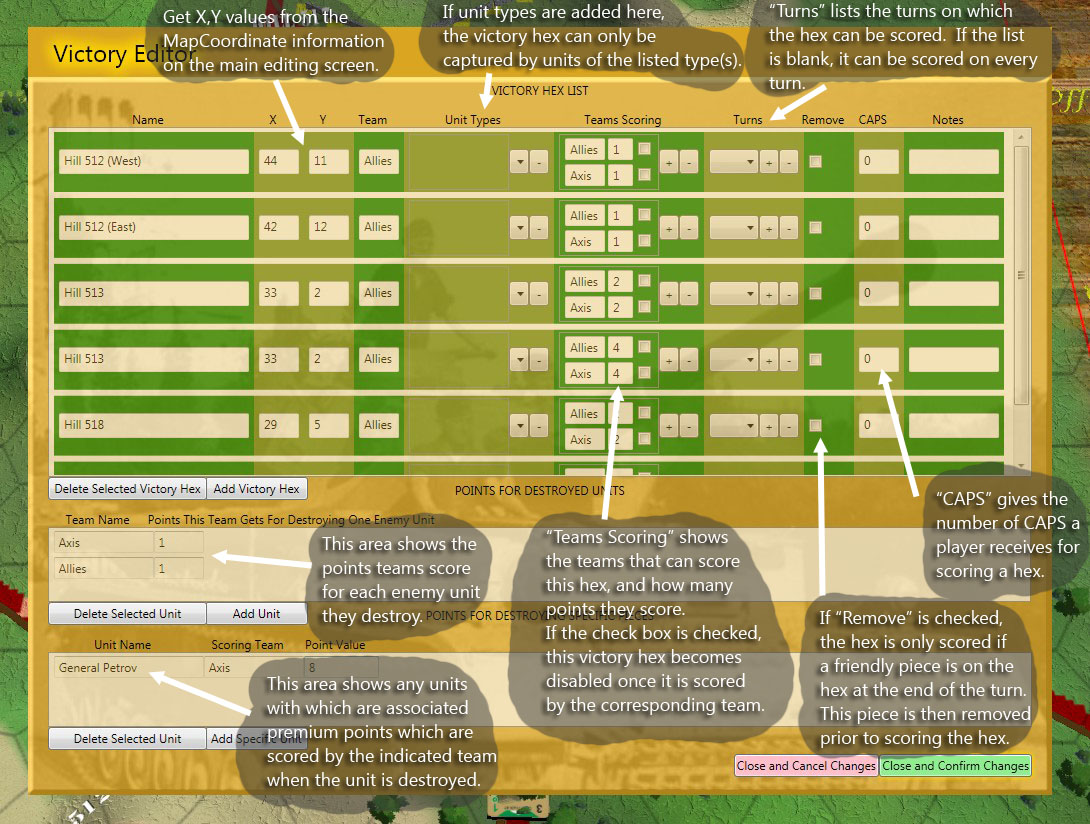
The Victory Editor
The victory editor lets you specify scoring conditions for a firefight.
TIP:One easy way to edit scenarios is to write down all the x,y coordinates you want to use in the scenario on a piece of paper so that you can reference them in the tools without having to go back and forth between the editors and the maps.
The Region Editor
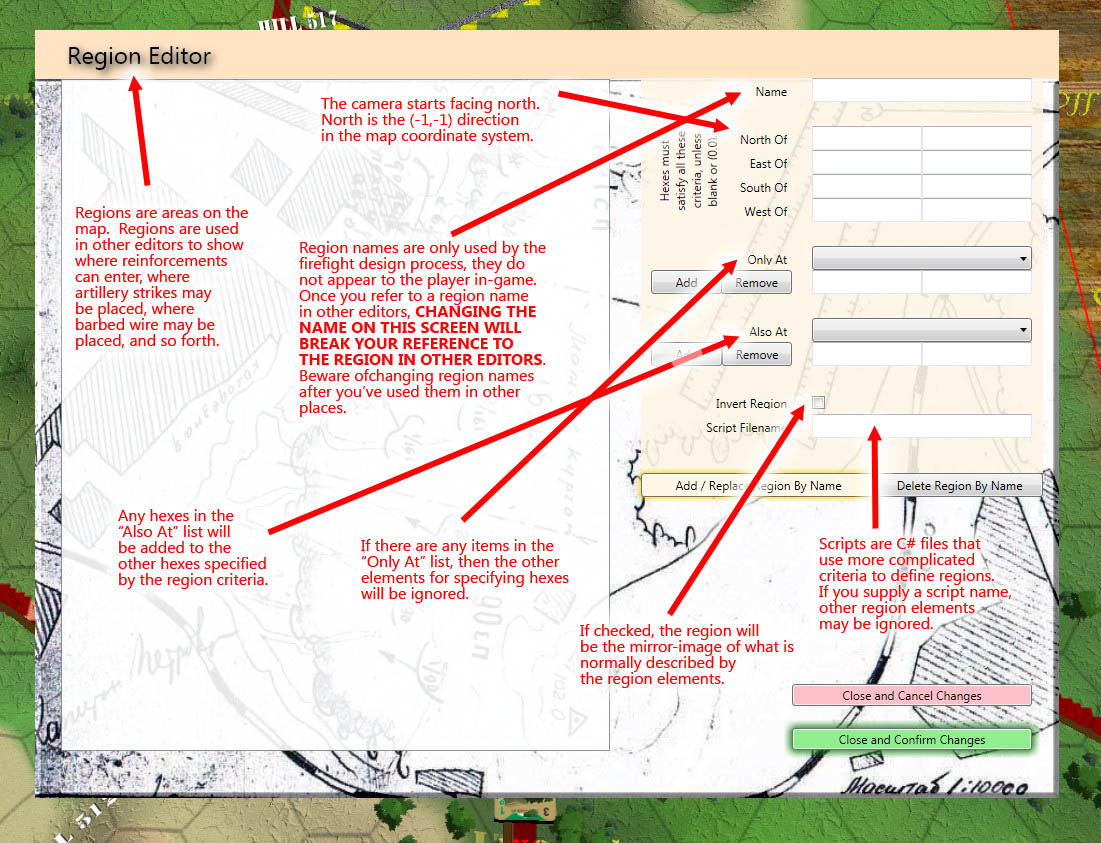
Regions are named collections of hexes on the map. They are used to define artillery strikes, reinforcement entry points, etc.
When you refer to a region in another editor (such as the Artillery Editor), you supply a reference to the name of a region. You can then change the parameters of that region later without having to update the reference. However, if you rename the region, then you'll break all references to it. Beware of renaming regions after you've created references to them.
Scripts for describing regions in greater detail are usually located in Data\Scenarios\Scripts. (If you look at the scripts there, you'll notice that the first few firefights exclusively used scripts. When the game was first being developed, that was the *only way* of defining region data. That quickly proved to be impractical!)
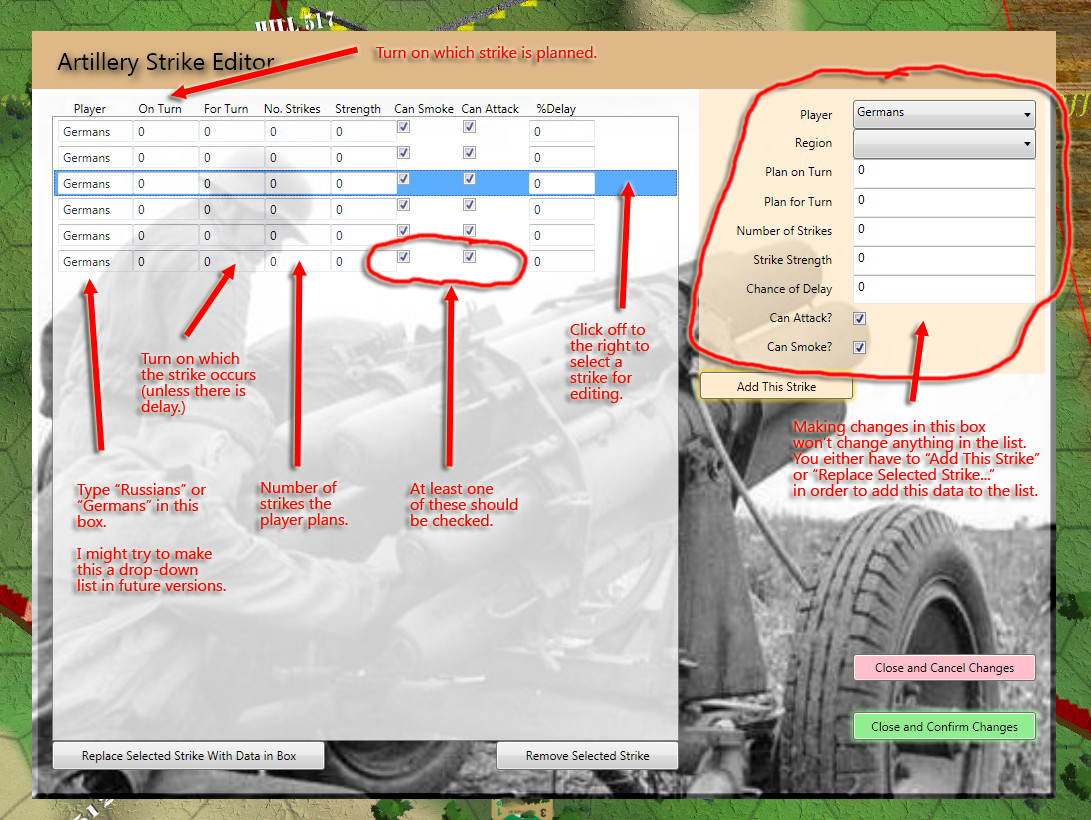
The Artillery Editor
The Artillery Editor lets you define artillery strikes.
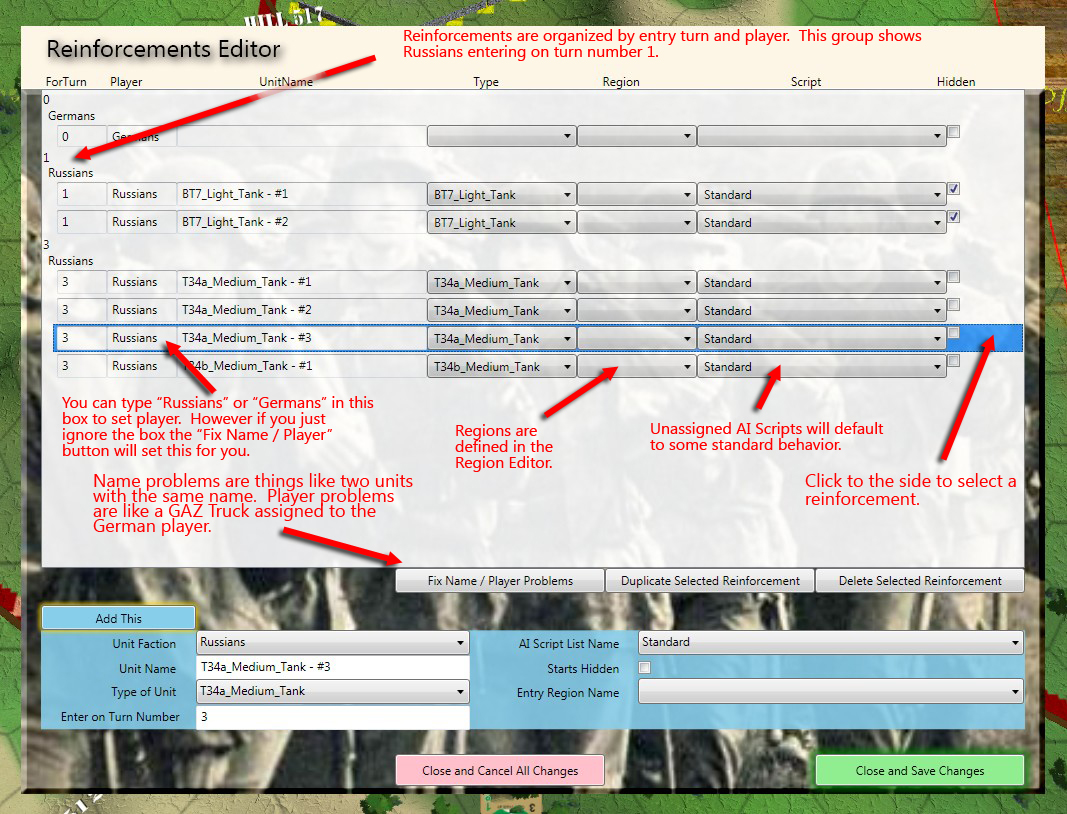
The Reinforcement Editor
The reinforcement editor lets you set up any units that do not begin the scenario on the map.
Notice you can assign different AI scripts to your reinforcements. See the "AI Scripts" section below.
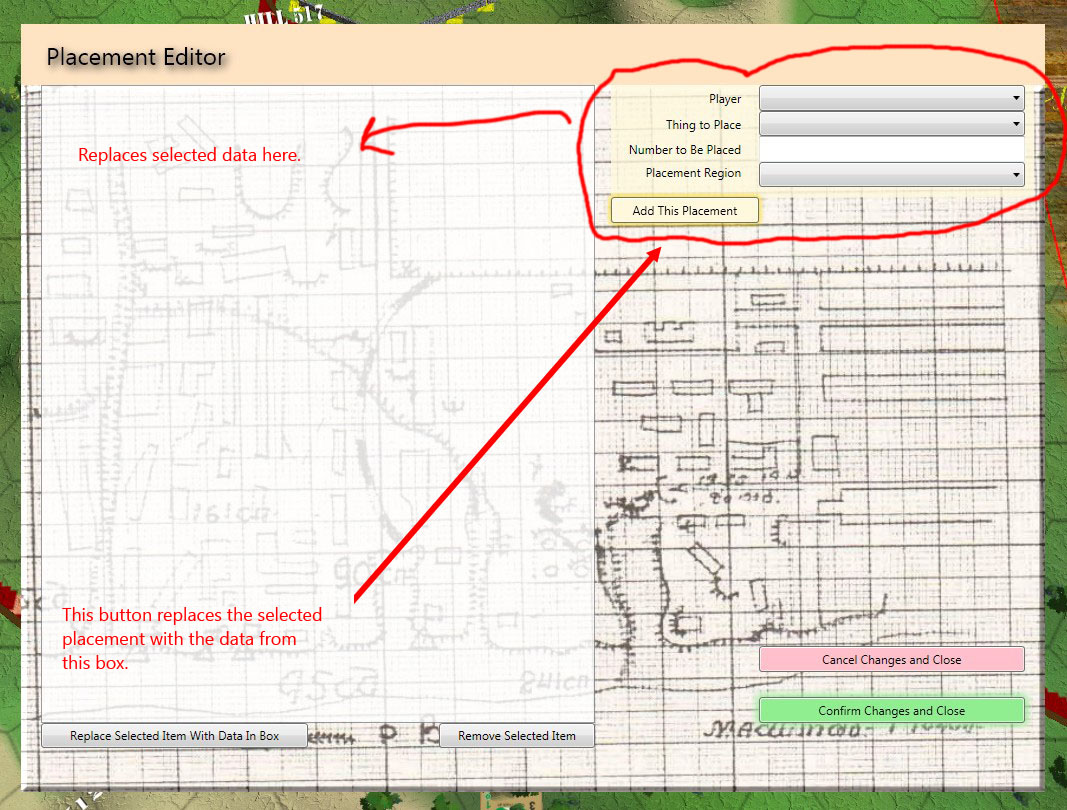
The Placement Editor
This is for doing things like letting a player setup mines or barbed wire at the start of a game.
You can also place units at the start of a game.
AI Scripts
AI scripts are small sets of instructions that the AI gives to units. These instructions can be global (telling a unit to take the fastest route to a victory hex, for example) or they can be conditional (telling a unit to fire if fired upon, for example).
CoH: ATB comes with a set of pre-written elements or instructions that can be combined into a larger script. Click on the "AI Script Editor" button from the main editor menu to view the script-builder page.
Writing Your Own AI Scripts
In addition, you can design your own AI scripts if you know the programming language C#. If you have basic knowledge of C#, feel free to examine the script structures; you may figure them out well enough to modify existing scripts, or even to write your own.
For example, here's text from a region script that invalidates all hexes that cannot be seen by friendly units. I post it merely to give you an idea of what these scripts look like. Time permitting, I can write more scripts if there are particular requests. The goal is to build up a little library of scripts that can be reused in ongoing firefight development, both for this game and for any sequels or expansions.
// CONFLICT OF HEROES

// Selection Script

// Copyright Western Civilization Software 2010

using HexGame.ModelSpace.Map.Coordinates;

using HexGame.ModelSpace.ContextSpace;

using HexGame.ModelSpace.Pieces;

using HexGame.Controllers.GameScene;
namespace HexGame.WCS.Script
{
  public class CallReinforcementScript : IScriptContext
  {
      public string RunScript(Context context)
      {
          // invalidate all hexes
          context.GameScene.LineOfSight.InvalidateAll(context.GameScene.HexMap);
          context.GameScene.LineOfSight.Clear();
          // remove invalid hexes wherever player can has a unit that can see
          foreach (Piece pc in context.PieceManager.GetPiecesOfPlayer(context.ActivePlayer))
              context.GameScene.LineOfSight.Build(context, pc.MapPos, null, false, false, null);
          foreach (MapCoord co in context.GameScene.LineOfSight.VisibleHexes.Keys)
              context.GameScene.LineOfSight.RemoveInvalid(co);
          return "";
     }
  }
}
